<?xml version="1.0" encoding="utf-8"?>
<feed xmlns="http://www.w3.org/2005/Atom">
    <id>https://lunasqu.ee/blog</id>
    <title>Evert's Blog</title>
    <updated>2026-02-16T18:29:53.000Z</updated>
    <generator>https://git.icynet.eu/evert/lunasqu.ee-nuxt</generator>
    <link rel="alternate" href="https://lunasqu.ee/blog"/>
    <link rel="self" href="https://lunasqu.ee/blog/atom.xml"/>
    <subtitle>Projects and Tutorials</subtitle>
    <rights>Evert "Diamond" Prants 2026</rights>
    <entry>
        <title type="html"><![CDATA[Making a Roblox-inspired character controller in Godot]]></title>
        <id>https://lunasqu.ee/blog/2026/02/16/Making-a-Roblox-inspired-character-controller-in-Godot</id>
        <link href="https://lunasqu.ee/blog/2026/02/16/Making-a-Roblox-inspired-character-controller-in-Godot"/>
        <updated>2026-02-16T18:29:53.000Z</updated>
        <summary type="html"><![CDATA[So, naturally, I wanted to make my own Roblox-inspired 3D character controller in Godot. This character controller features a hybrid first- and third-person camera, which can be switched between by simply zooming in and out with the mouse w]]></summary>
        <content type="html"><![CDATA[<p>So, naturally, I wanted to make my own Roblox-inspired 3D character controller in Godot. This character controller features a <strong>hybrid first- and third-person camera</strong>, which can be switched between by simply zooming in and out with the mouse wheel. This is the most important feature to me, as I really really enjoy playing using this control scheme. The player moves towards where you point your camera but can still rotate independently.</p>


<p>I have massive appreciation for the engineers at Roblox, the software platform is amazing and features some really impressive technology. I grew up on this website and even made a few simple games over the years. Unfortunately, the platform has been plagued by various issues over the years, such as a toxic playerbase, bad moderation with over-reliance on AI and, more recently, the forced push of requiring an AI face scan or government ID to even just chat in game. These issues have pushed players off the platform, looking for alternatives.</p>
<p>I have been looking for an alternative to Roblox, more specifically the Studio, for a while now. One example of such an alternative would be <a href="https://polytoria.com/" rel="nofollow" target="_blank">Polytoria</a>, which aims to become similar to what Roblox used to be like in the past. However, I am not a huge fan of the Polytoria Creator at the moment - it is a very clunky, buggy mess, in my opinion.</p>
<p>One thing that I have kept my eye on over the years is the free and open source <a href="https://godotengine.org/" rel="nofollow" target="_blank">Godot game engine</a>. I have played around with it in the past, I even wrote a <a href="/blog/2018/02/03/Giving-a-shot-at-making-a-game-using-Godot-Engine-3-0" rel="nofollow" target="_blank">blog post</a> about one of my earlier experiments. In fact, the upcoming Polytoria 2.0 update <a href="https://blog.polytoria.com/polytoria-2-0-progress-report-1/" rel="nofollow" target="_blank">is made using the Godot game engine</a>.</p>
<h2>The character model</h2>
<p>To get started, I modeled, rigged and animated a simple character model in <a href="https://www.blender.org/" rel="nofollow" target="_blank">Blender</a>. This process is out of the scope of this article, but I will share a few details about it.</p>
<p><img src="https://i.lunasqu.ee/blog/rodot00_character_blender.png" alt="Roblox-inspired blocky character in blender"></p>
<p>The character hands and torso are UV mapped to this texture:</p>
<p><img src="https://i.lunasqu.ee/blog/rodot00_character_shirt_uv.png" alt="Character model texture mapping"></p>
<p>The legs are mapped to the same coordinates as the hands, because in Roblox, the torso texture is composed of the &quot;Shirt&quot; + &quot;T-Shirt&quot; + the torso part of the &quot;Pants&quot; texture. So the legs have to use a separate texture, one made according to this template:</p>
<p><img src="https://i.lunasqu.ee/blog/rodot00_character_pants_uv.png" alt="Character model pants texture"></p>
<p>As of the writing of this article, I have not added support for this fashion of combinations to the character controller, but I might look into it in the future. The textures are applied to the model using the Nearest filtering, because Linear causes the white areas of the template to bleed in from the edges. You might also have to re-import the texture into Godot using the &quot;VRAM Uncompressed&quot; compression mode under the &quot;Import&quot; tab, which is next to &quot;Scene&quot; tab in the editor after selecting the .png file, for a crisp look without any color bleeding.</p>
<p>The head is made of a Cylinder mesh with a 0.45 m offset Bevel modifier with 8 segments. The other body parts are made of the Cube mesh, stretched out in Edit mode and have a 0.05 m offset Bevel modifier with 4 segments. The scale of the model in Blender is not important, as it can easily be adjusted in-engine to fit the specific game.</p>
<p>I also added the following &quot;animations&quot; to the model:</p>
<ul>
<li>Idle - just standing around;</li>
<li>Walk - a very simple walking animation;</li>
<li>Jump - A &quot;jump&quot; animation, well, it&#39;s more of a &quot;falling&quot; animation, actually;</li>
<li>Sit - A &quot;sitting&quot; pose;</li>
<li>ArmUp - This pose could be used for when the character is holding something.</li>
</ul>
<p>Export the model to glTF/glB, making sure to check &quot;Apply modifiers&quot; and to only export renderable objects. You may download the article version of the .glb file <a href="https://i.lunasqu.ee/blog/rodot00_character.glb" rel="nofollow" target="_blank">HERE</a>. You may find more up-to-date versions of it on my Gitea in the future.</p>
<h2>Setting up the scene</h2>
<p>Create a new Godot project. I chose the Forward+ renderer and the Godot version at the time of this article is 4.6.</p>
<p>Create a new <code>Node3D</code> scene as the main scene which you will be playing and building in. You can use the <a href="https://docs.godotengine.org/en/stable/tutorials/3d/csg_tools.html" rel="nofollow" target="_blank">CSGBox3D</a> node to quickly make yourself a platform (make sure to enable collisions) and some obstacles to test.</p>
<p>Those coming from Roblox will notice CSG as being very similar to the <a href="https://create.roblox.com/docs/parts/solid-modeling" rel="nofollow" target="_blank">Solid modeling</a> feature provided in Roblox Studio. The <code>CSGBox3D</code> node even has gizmo handles similar to the Roblox Studio&#39;s resize tool.</p>
<p>Please note that these nodes are not meant to be used in your finished game, however, you can convert them to mesh instances with the click of a button when you&#39;re finished and hide or remove the CSG nodes.</p>
<p>After setting up your main scene, create a new <code>Node3D</code> scene and change the root node type from <code>Node3D</code> to <code>CharacterBody3D</code>.</p>
<h2>The player scene</h2>
<p>In the player scene, add a new <code>Node3D</code>, I named it &quot;CharacterAnchor&quot; for no particular reason. Into this node, drag the &quot;character.glb&quot; file from the FileSystem browser. This loads the character model into the scene. You may want to decrease the scale of the imported &quot;character&quot; node to something like 0.1 if you&#39;re using my model.</p>
<p>The CharacterAnchor will be the node which we rotate later on in the movement code, independent of the player&#39;s camera, so that any hats or tools we want to give the character in the future rotate in unison with it. Speaking of the camera, add a new <code>Node3D</code> <strong>next to</strong> to the &quot;CharacterAnchor&quot; node, name it something like <code>CameraPivot</code> so that you can access it from code later. Inside the pivot put a <code>SpringArm3D</code> node and into that add a <code>Camera3D</code> node. Move the CameraPivot up into the center of the head. For me, that position is <code>0, 0.475, 0</code>.</p>
<p>In order to prevent issues with the <code>SpringArm3D</code> intersecting with your player (or other players), you should put your <code>CharacterBody3D</code> on another collision layer and set the <code>SpringArm3D</code> spring length to 0 to start with.</p>
<p><img src="https://i.lunasqu.ee/blog/rodot00_collision_group.png" alt="A screenshot showing the players collision layer is set to two, while mask remains on one"></p>
<p>Next, we will need to add a <code>CollisionShape3D</code> node into the player scene. Give it a <code>CapsuleShape3D</code> in order to have a more accurate collision when walking and climbing slopes and such. Place the capsule somewhere in the center of the character model, it doesn&#39;t have to be perfect and you can tweak it at any time. It is also possible to have multiple collision shapes if you wish. You can click on the Z axis in the gizmo on the top right of the viewport to make lining it up easier.</p>
<p><img src="https://i.lunasqu.ee/blog/rodot00_character_capsule.png" alt="A screenshot showing the parameters of the CapsuleShape3D used by me"></p>
<p>And finally, add an <code>AnimationTree</code> node in order to blend and transition the animations later. For the AnimationTree node, you have to select the <code>AnimationPlayer</code> inside the imported &quot;character&quot; node. In order to do that, you must first check the &quot;Editable children&quot; checkbox in the menu that appears when you right click on the &quot;character&quot; node.</p>
<p>Your player scene should now look something like this. Don&#39;t worry about the scripts just yet, we&#39;ll get there.</p>
<p><img src="https://i.lunasqu.ee/blog/rodot00_character_scene_new.png" alt="A screenshot showcasing how the player scene should look like at this point"></p>
<h2>The player script</h2>
<p>And now, we have arrived at the fun part! Attach a new script to the player scene itself (the <code>CharacterBody3D</code> node). First thing we will set up is the movement code. But before we can do that, we have to set up our inputs.</p>
<p>Open the Input Map dialog by going to Project -&gt; Project Settings... -&gt; Input Map. I have set up the following inputs in order to control the character.</p>
<p><img src="https://i.lunasqu.ee/blog/rodot00_inputs_new.png" alt="A screenshot showing my input mappings for the project"></p>
<p>Lets start by defining some variables in our script.</p>
<div class="codeblock"><pre><code class="hljs language-gdscript"><span class="hljs-keyword">extends</span> CharacterBody3D

<span class="hljs-comment">## Maximum zoom distance from the character&#x27;s head</span>
@<span class="hljs-keyword">export</span> <span class="hljs-keyword">var</span> MAX_ZOOM = <span class="hljs-number">10.0</span>

<span class="hljs-comment">## Maximum walking speed</span>
@<span class="hljs-keyword">export</span> <span class="hljs-keyword">var</span> WALK_MAX_SPEED = <span class="hljs-number">2</span>

<span class="hljs-comment">## Maximum walking speed while falling/jumping</span>
@<span class="hljs-keyword">export</span> <span class="hljs-keyword">var</span> JUMP_MOVE_SPEED = <span class="hljs-number">2</span>

<span class="hljs-comment">## The acceleration to bring the character up to max speed</span>
@<span class="hljs-keyword">export</span> <span class="hljs-keyword">var</span> ACCELERATION = <span class="hljs-number">16</span>

<span class="hljs-comment">## The deceleration to bring the character up a standstill</span>
@<span class="hljs-keyword">export</span> <span class="hljs-keyword">var</span> DECELERATION = <span class="hljs-number">16</span>

<span class="hljs-comment">## Gravity that applies to this player</span>
@<span class="hljs-keyword">export</span> <span class="hljs-keyword">var</span> GRAVITY = -<span class="hljs-number">9.8</span>

<span class="hljs-comment">## The mass of the player. Can be used to tweak the falling speed instead of changing the gravity.</span>
@<span class="hljs-keyword">export</span> <span class="hljs-keyword">var</span> MASS = <span class="hljs-number">1.2</span>

<span class="hljs-comment">## The force of the jump</span>
@<span class="hljs-keyword">export</span> <span class="hljs-keyword">var</span> JUMP_SPEED = <span class="hljs-number">5</span>

<span class="hljs-comment">## Rotation speed of the character towards the face direction</span>
@<span class="hljs-keyword">export</span> <span class="hljs-keyword">var</span> ROTATION_SPEED = TAU * <span class="hljs-number">2</span>

<span class="hljs-comment">## Sensitivity of the camera, in degrees. Larger number = more camera movement with mouse.</span>
@export_range(<span class="hljs-number">0.01</span>, <span class="hljs-number">1</span>, <span class="hljs-number">0.01</span>) <span class="hljs-keyword">var</span> VIEW_SENSITIVITY = <span class="hljs-number">0.45</span>

<span class="hljs-comment"># Load in the parts of the scene we need to access from code.</span>
@<span class="hljs-keyword">onready</span> <span class="hljs-keyword">var</span> pivot = $CharacterAnchor
@<span class="hljs-keyword">onready</span> <span class="hljs-keyword">var</span> camera_pivot = $CameraPivot
@<span class="hljs-keyword">onready</span> <span class="hljs-keyword">var</span> spring_arm = $CameraPivot/SpringArm3D</code></pre></div><p>Let&#39;s add the movement code now. We will do so in the <code>_physics_process</code> function. In this script, the &quot;velocity&quot; is a property of the CharacterBody3D itself. The physics process is ran every physics tick, separate from other updates such as those done in <code>_process</code>.</p>
<p>We can utilize Godot&#39;s <a href="https://docs.godotengine.org/en/stable/classes/class_input.html#class-input-method-get-vector" rel="nofollow" target="_blank">Input.get_vector</a> method to get a 2D vector of the movement direction according to the inputs. The player&#39;s inputs may be analog, so we don&#39;t want to just check if they are pressed or not.</p>
<div class="codeblock"><pre><code class="hljs language-gdscript"><span class="hljs-function"><span class="hljs-keyword">func</span> <span class="hljs-title">_physics_process</span>(<span class="hljs-title">delta</span>:</span> <span class="hljs-built_in">float</span>):
	<span class="hljs-keyword">var</span> direction = Input.get_vector(<span class="hljs-string">&quot;move_left&quot;</span>, <span class="hljs-string">&quot;move_right&quot;</span>, <span class="hljs-string">&quot;move_forward&quot;</span>, <span class="hljs-string">&quot;move_backward&quot;</span>)

	<span class="hljs-comment"># We convert the movement direction from 2D to 3D</span>
	direction = <span class="hljs-built_in">Vector3</span>(direction.x, <span class="hljs-number">0.0</span>, direction.y)

	<span class="hljs-comment"># apply gravity if falling</span>
	<span class="hljs-keyword">if</span> <span class="hljs-keyword">not</span> is_on_floor():
		velocity.y += delta * GRAVITY * MASS

	<span class="hljs-comment"># Since direction is a normal vector, it has a length of one.</span>
	<span class="hljs-comment"># We want to make this vector equal the walking speed.</span>
	<span class="hljs-keyword">var</span> walk_speed = WALK_MAX_SPEED
	<span class="hljs-keyword">if</span> <span class="hljs-keyword">not</span> is_on_floor():
		walk_speed = JUMP_MOVE_SPEED

	<span class="hljs-keyword">var</span> target = direction * walk_speed

	<span class="hljs-comment"># If the character is moving, we must accelerate. Otherwise decelerate.</span>
	<span class="hljs-keyword">var</span> acceleration = DECELERATION
	<span class="hljs-keyword">if</span> direction.length() &gt; <span class="hljs-number">0</span>:
		acceleration = ACCELERATION

	<span class="hljs-comment"># Calculate the velocity to move toward the target, but only on the horizontal plane XZ.</span>
	<span class="hljs-comment"># Move towards the desired velocity using linear interpolation and the acceleration amount</span>
	<span class="hljs-comment"># multiplied by the delta time as the weight.</span>
	velocity.x = lerpf(velocity.x, target.x, acceleration * delta)
	velocity.z = lerpf(velocity.z, target.z, acceleration * delta)

	<span class="hljs-comment"># Move the character along the floor using the</span>
	<span class="hljs-comment"># built-in move and slide function from the CharacterBody3D.</span>
	move_and_slide()

	<span class="hljs-comment"># If the jump action was pressed, set the upwards velocity to the jump speed.</span>
	<span class="hljs-keyword">if</span> is_on_floor() <span class="hljs-keyword">and</span> Input.is_action_pressed(<span class="hljs-string">&quot;jump&quot;</span>):
		velocity.y = JUMP_SPEED</code></pre></div><p>In order to get the character to smoothly face the direction they are going in, we need add a little bit of extra code. Add this immediately after converting the <code>direction</code> into a <code>Vector3</code>. I don&#39;t pretend to fully understand how this works, but here is an explanation and a guide on how to do this in 2D as well: <a href="https://www.youtube.com/watch?v=NrvIuBu3-8I" rel="nofollow" target="_blank">How to Rotate Smoothly to Face a Direction in Godot - YouTube</a>.</p>
<div class="codeblock"><pre><code class="hljs language-gdscript">	<span class="hljs-keyword">if</span> direction.length():
		<span class="hljs-keyword">var</span> _theta = <span class="hljs-built_in">wrapf</span>(<span class="hljs-built_in">atan2</span>(direction.x, direction.z) - pivot.rotation.y, -PI, PI)
		pivot.rotation.y += <span class="hljs-built_in">clampf</span>(ROTATION_SPEED * delta, <span class="hljs-number">0</span>, <span class="hljs-built_in">abs</span>(_theta)) * <span class="hljs-built_in">sign</span>(_theta)</code></pre></div><h3>Implementing the camera</h3>
<p>First, we will need to declare a few additional variables at the top of the script.</p>
<div class="codeblock"><pre><code class="hljs language-gdscript"><span class="hljs-comment">## Convert the VIEW_SENSITIVITY to radians,</span>
<span class="hljs-comment">## because it is easier to input degrees when testing.</span>
@<span class="hljs-keyword">onready</span> <span class="hljs-keyword">var</span> sensitivity = deg_to_rad(VIEW_SENSITIVITY)

<span class="hljs-keyword">var</span> third_person = <span class="hljs-literal">false</span>
<span class="hljs-keyword">var</span> restore_mouse_pos = <span class="hljs-built_in">Vector2</span>()

<span class="hljs-comment"># This constant helps us constrain the camera pitch</span>
<span class="hljs-comment"># to just below 90 degrees in both directions.</span>
<span class="hljs-keyword">const</span> MAX_PITCH = (PI / <span class="hljs-number">2</span>) - deg_to_rad(<span class="hljs-number">1</span>)</code></pre></div><p>That should be all for the variables we need for our camera code, so now lets implement moving the camera. Let&#39;s declare the <code>_unhandled_input</code> function, which will be ran every time there is an input from the player and it is not handled by something else, like the GUI. Lets start with the zooming. This code will set the zoom when the mouse wheel is scrolled, constraining it to a value between zero and <code>MAX_ZOOM</code>. The zoom is mostly handled by the <code>SpringArm3D</code> node we added earlier; it also makes sure that the camera does not go through objects. Very handy.</p>
<div class="codeblock"><pre><code class="hljs language-gdscript"><span class="hljs-function"><span class="hljs-keyword">func</span> <span class="hljs-title">update_zoom</span>(<span class="hljs-title">new_zoom_level</span>:</span> <span class="hljs-built_in">int</span>) -&gt; <span class="hljs-keyword">void</span>:
	spring_arm.spring_length = <span class="hljs-built_in">clamp</span>(new_zoom_level, <span class="hljs-number">0</span>, MAX_ZOOM)

<span class="hljs-function"><span class="hljs-keyword">func</span> <span class="hljs-title">_unhandled_input</span>(<span class="hljs-title">ev</span>:</span> InputEvent):
	<span class="hljs-keyword">if</span> ev <span class="hljs-keyword">is</span> InputEventMouseButton <span class="hljs-keyword">and</span> ev.pressed:
		<span class="hljs-keyword">if</span> ev.button_index == MOUSE_BUTTON_WHEEL_DOWN:
			update_zoom(spring_arm.spring_length + <span class="hljs-number">1</span>)
		<span class="hljs-keyword">elif</span> ev.button_index == MOUSE_BUTTON_WHEEL_UP:
			update_zoom(spring_arm.spring_length - <span class="hljs-number">1</span>)</code></pre></div><p>Now, let&#39;s add the yaw and pitch calculations based on the mouse movement for the camera. We can use the relative mouse position from the event to determine the new rotation angles for the camera.</p>
<div class="codeblock"><pre><code class="hljs language-gdscript">	<span class="hljs-keyword">if</span> ev <span class="hljs-keyword">is</span> InputEventMouseMotion:
		<span class="hljs-keyword">if</span> <span class="hljs-keyword">not</span> third_person <span class="hljs-keyword">or</span> Input.is_action_pressed(<span class="hljs-string">&quot;camera_pan&quot;</span>):
			<span class="hljs-comment"># move camera based on mouse position</span>
			camera_pivot.rotation.x = <span class="hljs-built_in">clampf</span>(
				camera_pivot.rotation.x - ev.relative.y * sensitivity,
				-MAX_PITCH,
				MAX_PITCH
			)
			camera_pivot.rotation.y = <span class="hljs-built_in">fmod</span>(
				camera_pivot.rotation.y - ev.relative.x * sensitivity,
				TAU
			)</code></pre></div><p>In a real game, you probably want to improve this by allowing a joystick to be used for this purpose as well. You may find inspiration on how to do that in the <a href="https://docs.godotengine.org/en/stable/classes/class_input.html#class-input-method-get-action-strength" rel="nofollow" target="_blank">Godot documentation</a>.</p>
<p>The pitch angle is constrained to just below 90 degrees in both directions, because some weird stuff happens at 90 degrees (or the &quot;poles&quot;, if you will), such as spinning or walking backwards.</p>
<p>Now, let&#39;s add a function to update the camera state. If the previous camera state was third person mode, we will set the mouse to be captured and ensure that the camera is positioned at the camera root (inside the head) and we also hide the player model (otherwise we will be looking at the inside of our head instead). Afterwards, we set the camera&#39;s rotation to our calculated angles directly.</p>
<div class="codeblock"><pre><code class="hljs language-gdscript"><span class="hljs-function"><span class="hljs-keyword">func</span> <span class="hljs-title">update_view_mode</span>():</span>
	<span class="hljs-keyword">var</span> zoom = spring_arm.spring_length
	<span class="hljs-keyword">var</span> previously_third_person = third_person
	third_person = zoom &gt; <span class="hljs-number">0</span>

	<span class="hljs-keyword">if</span> third_person <span class="hljs-keyword">and</span> <span class="hljs-keyword">not</span> previously_third_person:
		visible = <span class="hljs-literal">true</span>

		<span class="hljs-keyword">if</span> <span class="hljs-keyword">not</span> Input.is_action_pressed(<span class="hljs-string">&quot;camera_pan&quot;</span>):
			Input.set_mouse_mode(Input.MOUSE_MODE_VISIBLE)
	<span class="hljs-keyword">elif</span> <span class="hljs-keyword">not</span> third_person <span class="hljs-keyword">and</span> previously_third_person:
		Input.set_mouse_mode(Input.MOUSE_MODE_CAPTURED)
		visible = <span class="hljs-literal">false</span></code></pre></div><p>And to finish off the camera update code, add the <code>update_view_mode()</code> call to the <code>update_zoom</code> function, like so.</p>
<div class="codeblock"><pre><code class="hljs language-gdscript"><span class="hljs-function"><span class="hljs-keyword">func</span> <span class="hljs-title">update_zoom</span>(<span class="hljs-title">new_zoom_level</span>:</span> <span class="hljs-built_in">int</span>) -&gt; <span class="hljs-keyword">void</span>:
	spring_arm.spring_length = <span class="hljs-built_in">clamp</span>(new_zoom_level, <span class="hljs-number">0</span>, MAX_ZOOM)
	update_view_mode()</code></pre></div><p>Lets also lock the mouse when the script first runs and hide the player character.</p>
<div class="codeblock"><pre><code class="hljs language-gdscript"><span class="hljs-function"><span class="hljs-keyword">func</span> <span class="hljs-title">_ready</span>():</span>
	Input.set_mouse_mode(Input.MOUSE_MODE_CAPTURED)
	visible = <span class="hljs-literal">false</span></code></pre></div><p>Now that the camera is working, you will notice that the player does not walk in the direction you are looking. That is a simple fix, though, so go back to the <code>_physics_process</code> function and change the line where we calculate the 3D direction to this:</p>
<div class="codeblock"><pre><code class="hljs language-gdscript">	direction = <span class="hljs-built_in">Vector3</span>(direction.x, <span class="hljs-number">0.0</span>, direction.y).rotated(
		<span class="hljs-keyword">self</span>.up_direction,
		camera_pivot.rotation.y
	)</code></pre></div><p>All we did was to rotate the direction vector by the direction the camera is facing (the yaw). Now it doesn&#39;t matter where we turn our camera; the player character will always go in the direction we would expect it to go.</p>
<p>You might also like to exit first person mode when some key is pressed. Here is how I did it by pressing the escape key. Add the following code to the <code>_unhandled_input</code> function.</p>
<div class="codeblock"><pre><code class="hljs language-gdscript">	<span class="hljs-keyword">if</span> Input.is_action_just_pressed(<span class="hljs-string">&quot;free_mouse&quot;</span>) <span class="hljs-keyword">and</span> <span class="hljs-keyword">not</span> third_person:
		update_zoom(<span class="hljs-number">1</span>)</code></pre></div><p>And I prefer to lock the mouse in place when the camera is being panned in third person mode, so I also added the following lines to <code>_unhandled_input</code>.</p>
<div class="codeblock"><pre><code class="hljs language-gdscript">	<span class="hljs-keyword">if</span> third_person <span class="hljs-keyword">and</span> event.is_action_pressed(<span class="hljs-string">&quot;camera_pan&quot;</span>):
		restore_mouse_pos = get_viewport().get_mouse_position()
		Input.set_mouse_mode(Input.MOUSE_MODE_CAPTURED)

	<span class="hljs-keyword">if</span> third_person <span class="hljs-keyword">and</span> event.is_action_released(<span class="hljs-string">&quot;camera_pan&quot;</span>):
		Input.set_mouse_mode(Input.MOUSE_MODE_VISIBLE)
		get_viewport().warp_mouse(restore_mouse_pos)</code></pre></div><p>This will remember the position of the mouse, hide the mouse cursor and lock it into the center of the screen when the right mouse button is pressed down. When we let go of the right mouse button, the mouse will be made visible again and moved to the position it was hidden in.</p>
<h2>The animation script</h2>
<p>The movement and camera tricks should be working fine now, so lets make the character feel more alive by implementing the animations. We are using the <a href="https://docs.godotengine.org/en/latest/tutorials/animation/animation_tree.html" rel="nofollow" target="_blank">AnimationTree</a> node to smoothly transition between the various animations we have. Here is the tree structure I ended up with.</p>
<p><img src="https://i.lunasqu.ee/blog/rodot00_animation_tree.png" alt="A screenshot of the Godot AnimationTree panel, showing the animation nodes connected to blend nodes which are then daisy-chained to the output"></p>
<p>Here is a video explaining the rationale behind these choices: <a href="https://www.youtube.com/watch?v=dPzHkK1Egns" rel="nofollow" target="_blank">Godot 4 Animation Blend Tree Tutorial - YouTube</a></p>
<p>Attach a new script to the <code>AnimationTree</code> component. The following code sets up the animations, and shows how to update the animation tree.</p>
<div class="codeblock"><pre><code class="hljs language-gdscript"><span class="hljs-keyword">extends</span> AnimationTree

@<span class="hljs-keyword">onready</span> <span class="hljs-keyword">var</span> player = <span class="hljs-keyword">self</span>.get_parent()
@<span class="hljs-keyword">onready</span> <span class="hljs-keyword">var</span> animator = <span class="hljs-keyword">self</span>.get_node(<span class="hljs-keyword">self</span>.anim_player)

@<span class="hljs-keyword">export</span> <span class="hljs-keyword">var</span> blend_speed = <span class="hljs-number">15</span>

<span class="hljs-keyword">enum</span> { IDLE, JUMP, WALK, SIT }
<span class="hljs-keyword">var</span> current = IDLE

<span class="hljs-keyword">var</span> _walk_val = <span class="hljs-number">0</span>
<span class="hljs-keyword">var</span> _jump_val = <span class="hljs-number">0</span>
<span class="hljs-keyword">var</span> _sit_val = <span class="hljs-number">0</span>

<span class="hljs-function"><span class="hljs-keyword">func</span> <span class="hljs-title">_ready</span>() -&gt; <span class="hljs-title">void</span>:</span>
	<span class="hljs-keyword">self</span>.animator.get_animation(<span class="hljs-string">&quot;Idle&quot;</span>).loop_mode = Animation.LOOP_LINEAR
	<span class="hljs-keyword">self</span>.animator.get_animation(<span class="hljs-string">&quot;Walk&quot;</span>).loop_mode = Animation.LOOP_LINEAR

<span class="hljs-function"><span class="hljs-keyword">func</span> <span class="hljs-title">_update_animations</span>() -&gt; <span class="hljs-title">void</span>:</span>
	<span class="hljs-keyword">self</span>[<span class="hljs-string">&quot;parameters/Walk/blend_amount&quot;</span>] = _walk_val
	<span class="hljs-keyword">self</span>[<span class="hljs-string">&quot;parameters/Jump/blend_amount&quot;</span>] = _jump_val
	<span class="hljs-keyword">self</span>[<span class="hljs-string">&quot;parameters/Sit/blend_amount&quot;</span>] = _sit_val

<span class="hljs-function"><span class="hljs-keyword">func</span> <span class="hljs-title">_handle_animations</span>(<span class="hljs-title">delta</span>:</span> <span class="hljs-built_in">float</span>) -&gt; <span class="hljs-keyword">void</span>:
	<span class="hljs-keyword">match</span> current:
		IDLE:
			_jump_val = lerpf(_jump_val, <span class="hljs-number">0</span>, blend_speed * delta)
			_walk_val = lerpf(_walk_val, <span class="hljs-number">0</span>, blend_speed * delta)
			_sit_val = lerpf(_sit_val, <span class="hljs-number">0</span>, blend_speed * delta)
		SIT:
			_jump_val = lerpf(_jump_val, <span class="hljs-number">0</span>, blend_speed * delta)
			_walk_val = lerpf(_walk_val, <span class="hljs-number">0</span>, blend_speed * delta)
			_sit_val = lerpf(_sit_val, <span class="hljs-number">1</span>, blend_speed * delta)
		WALK:
			_jump_val = lerpf(_jump_val, <span class="hljs-number">0</span>, blend_speed * delta)
			_walk_val = lerpf(_walk_val, <span class="hljs-number">1</span>, blend_speed * delta)
			_sit_val = lerpf(_sit_val, <span class="hljs-number">0</span>, blend_speed * delta)
		JUMP:
			_jump_val = lerpf(_jump_val, <span class="hljs-number">1</span>, blend_speed * delta)
			_walk_val = lerpf(_walk_val, <span class="hljs-number">0</span>, blend_speed * delta)
			_sit_val = lerpf(_sit_val, <span class="hljs-number">0</span>, blend_speed * delta)</code></pre></div><p>And then finally we add the physics process function which will switch between the different states.</p>
<div class="codeblock"><pre><code class="hljs language-gdscript"><span class="hljs-function"><span class="hljs-keyword">func</span> <span class="hljs-title">_physics_process</span>(<span class="hljs-title">delta</span>:</span> <span class="hljs-built_in">float</span>) -&gt; <span class="hljs-keyword">void</span>:
	_handle_animations(delta)
	_update_animations()

	<span class="hljs-keyword">if</span> <span class="hljs-keyword">not</span> player.is_on_floor():
		current = JUMP
	<span class="hljs-keyword">elif</span> player.get_real_velocity().length():
		current = WALK
	<span class="hljs-keyword">else</span>:
		current = IDLE</code></pre></div><h2>The result</h2>
<p><video controls><source src="https://i.lunasqu.ee/blog/rodot00_result.webm" type="video/webm" /></video></p>
<h2>Updates</h2>
<ul>
<li>2026/02/20 17:05 - Specified a fix for a <code>SpringArm3D</code> intersection with the player glitch.</li>
<li>2026/02/17 21:44 - Incorporated <code>SpringArm3D</code> instead of manual raycasting.</li>
<li>2026/02/16 20:29 - Initial version.</li>
</ul>
]]></content>
        <category scheme="https://lunasqu.ee/blog/tags/game" term="game"/>
        <category scheme="https://lunasqu.ee/blog/tags/projects" term="projects"/>
        <category scheme="https://lunasqu.ee/blog/tags/godot" term="godot"/>
        <category scheme="https://lunasqu.ee/blog/tags/tutorial" term="tutorial"/>
        <published>2026-02-16T18:29:53.000Z</published>
    </entry>
    <entry>
        <title type="html"><![CDATA[Self-hosting, Part 1]]></title>
        <id>https://lunasqu.ee/blog/2019/02/23/Self-hosting-Part-1</id>
        <link href="https://lunasqu.ee/blog/2019/02/23/Self-hosting-Part-1"/>
        <updated>2019-02-23T21:17:18.000Z</updated>
        <summary type="html"><![CDATA[Today I will be describing to you my experiences with self-hosting and how you can get started as well. ]]></summary>
        <content type="html"><![CDATA[<p>Today I will be describing to you my experiences with self-hosting and how you can get started as well.</p>


<p>I’m not going to go into detail in this article about how to install and configure anything, but the websites for respective pieces of software have great documentation and you can always look for more information online. Followup blog posts may come in the future describing setups that I’ve created.</p>
<h2>1. Hardware</h2>
<p>Believe it or not, you don’t actually need a server computer to host your websites, email or other networked software. You can use pretty much any old computer to do what you want. I know a guy who uses a laptop without a screen as a server, and quite successfully so. Your server could be anything, from an old Android phone to a router to an actual server computer, just as long as you have it connected to a network.</p>
<p>I have personally been using <a href="https://www.raspberrypi.org/" rel="nofollow" target="_blank">Raspberry Pi</a> computers for my personal servers. What you might learn the hard way, though, that you really don’t want to do many write operations on a simple SD card, instead, I recommend getting a 2.5” Hard Disk Drive or a even a Solid State Drive with a simple USB to SATA converter, which you can get cheap off <a href="https://www.ebay.com/sch/i.html?_from=R40&_trksid=m570.l1313&_nkw=usb+to+sata&_sacat=0" rel="nofollow" target="_blank">eBay</a> or <a href="https://www.aliexpress.com/wholesale?SearchText=usb+to+sata" rel="nofollow" target="_blank">AliExpress</a>. I’ve had quite a few corrupted SD cards on my Raspberry Pi’s due to high amount of concurrent writes.</p>
<h3>1.1. Hosting services</h3>
<p>For most of the heavy-lifting, though, I recommend using Virtual Private Servers for online services. I use a 10€/month cloud server from <a href="https://www.hetzner.com/cloud" rel="nofollow" target="_blank">Hetzner</a> to host most of my websites, databases and email. I can only really recommend Hetzner and <a href="https://www.ovh.com/" rel="nofollow" target="_blank">OVH</a> because I’ve had the best experiences with them, but you can search around the web for VPS hosting. Be sure to look at reviews and make sure to read the Terms of Service notices!</p>
<p>If you have more money to spend, you can also look for hosted dedicated servers.</p>
<p>With hosting services, you also avoid the problem of having to expose your IP address or open ports on your local network. If you don’t like your IP address being public or you simply are unable to open ports on your network, I strongly recommend that you get a low cost virtual private server instead of any local computer.</p>
<h2>2. Operating System</h2>
<p>What you’re looking for here is an operating system based on the <a href="https://en.wikipedia.org/wiki/Linux_kernel" rel="nofollow" target="_blank">Linux kernel</a>. I can recommend <a href="https://www.debian.org/intro/about" rel="nofollow" target="_blank">Debian</a>, <a href="https://www.centos.org/" rel="nofollow" target="_blank">CentOS</a> and <a href="https://www.archlinux.org/" rel="nofollow" target="_blank">Arch Linux</a>. Linux systems are (mostly, there are paid enterprise solutions) completely free, in every sense of the word, and open source.</p>
<p>If you run into any issues with Linux systems, or just want to know how to configure or use a certain program, an absolutely wonderful online resource is the <a href="https://wiki.archlinux.org/" rel="nofollow" target="_blank">Arch Linux Wiki</a>, and you don’t even have to use Arch Linux in order for it to be useful to you.</p>
<h2>3. Software</h2>
<p>There’s <em>a lot</em> of things you can run on your own server computer, so in this section, I’m going to tell you about some of the more common and more useful services.</p>
<h3>3.1. Website hosting</h3>
<p>Of course everybody wants to have a website. What would a self-hosted server be without a website?</p>
<p>The first thing you need in order to run a website is a web server. For beginners and simple setups, the most popular choice is the <a href="https://httpd.apache.org/" rel="nofollow" target="_blank">Apache HTTP Server</a>, however for more versatility and better (in my opinion) configuration and proxying, I recommend <a href="http://nginx.org/" rel="nofollow" target="_blank">nginx</a> as well.</p>
<p>For the actual content of the website, you also have <em>a lot</em> of options. A very good and popular free platform you can use is <a href="https://wordpress.org/" rel="nofollow" target="_blank">WordPress</a>. Of course, there’s the possibility of writing a website yourself, either in PHP and HTML or just HTML and CSS.</p>
<h3>3.2. Private File Cloud</h3>
<p>If you’re like me and don’t like having your files on <strong>someone else’s computer</strong>, hosting a “file cloud” yourself is a good bet. The best software to do this (by far) is <a href="https://nextcloud.com/" rel="nofollow" target="_blank">NextCloud</a>. It allows you to easily synchronize files between your computers and mobile phones and you always know that your files are safe in your own hands.</p>
<p>Be warned though, this application server takes a good chunk of your computer resources, so you might need something more powerful than a Raspberry Pi for this one.</p>
<h4>3.2.1. Online Documents</h4>
<p>NextCloud can very easily help you transfer documents between your devices, but there’s also the option to integrate an Office platform, such as <a href="https://nextcloud.com/collaboraonline/" rel="nofollow" target="_blank">Collabora Online</a>, which allows you to view and edit your Office documents on the go, just like Google Docs or Office 356 Online, but you’re in control!</p>
<p>Be warned again, these applications are also a significant load on your server.</p>
<h3>3.3. Mail Server</h3>
<p>Okay, so you’ve got it in your head that you also want to host a mail server for yourself, but let me stop you right there. Setting up a mail server is <strong>a really tedious and time consuming task</strong> and you’ll probably end up giving up and using Gmail or Outlook in the end anyway. A misconfigured email server could also do a lot of harm, so please be careful with what you configure and always read the documentation if you really do plan on hosting your own mail server.</p>
<p>If that didn’t scare you, you may proceed. Just know that you should <strong>NEVER</strong> host an open email relay unless you really know what you’re doing.</p>
<h4>3.3.1. Mail Transfer Agent (MTA)</h4>
<p>The MTA is the program used to send emails. It does not necessarily let you read/manage inboxes on its own.</p>
<p>One of the more popular MTAs, and the one I use, is <a href="http://www.postfix.org/" rel="nofollow" target="_blank">Postfix</a>. Creating the perfect configuration to meet your needs is, again, a tedious task. You can look for example configurations online and try them out yourself.</p>
<h4>3.3.2. Mail access (IMAP, POP3)</h4>
<p>This is the application that actually allows you to access and store your emails on your server.</p>
<p>The most popular software for this is <a href="https://www.dovecot.org/" rel="nofollow" target="_blank">Dovecot</a>. Dovecot is really good at doing what it does and it allows you to set up mailboxes and can even do message sorting (<a href="https://wiki2.dovecot.org/Pigeonhole" rel="nofollow" target="_blank">pigeonhole</a> sieve).</p>
<h4>3.3.3. Mail filtering</h4>
<p>Mail filtering is what you would use to combat spam.</p>
<p>A great free software for combating spam is <a href="https://spamassassin.apache.org/" rel="nofollow" target="_blank">SpamAssassin</a> and you can use <a href="https://www.clamav.net/" rel="nofollow" target="_blank">ClamAV</a> to detect viruses in incoming mail.</p>
<h3>3.4. Database</h3>
<p>If you need a database, your own server is also a good place for that. For SQL databases, I recommend using <a href="https://mariadb.org/" rel="nofollow" target="_blank">MariaDB</a>. For NoSQL, you could use <a href="https://www.mongodb.com/" rel="nofollow" target="_blank">MongoDB</a>. You’ll need a MariaDB database if you’re going to host WordPress on your server.</p>
<h2>4. Communication</h2>
<p>Communication is an important part of society. Did you know that there are free and open source solutions that you can put on your own server that allows you to communicate with your friends? Here are some that I have personally come in contact with and can recommend.</p>
<p><strong>1. An aging, historical solution: IRC</strong><br>IRC (Internet Relay Chat) is an old text-based protocol used in ages old chat rooms. Believe it or not, it is still used to this day. IRC is a quick and easy way to communicate in text. A popular IRC server application is <a href="http://www.inspircd.org/" rel="nofollow" target="_blank">inspIRCd</a>.</p>
<p>I personally still host an IRC server for me and my friends.</p>
<p><strong>2. Purely for voice chatting: Mumble</strong><br><a href="https://wiki.mumble.info/wiki/Main_Page" rel="nofollow" target="_blank">Mumble</a> is a free and open source low latency voice chatting application. In order to host your own server for Mumble, you need <a href="https://wiki.mumble.info/wiki/Running_Murmur" rel="nofollow" target="_blank">Murmur</a> (mumble-server).</p>
<p><strong>3. Up-and-coming communication standard: Matrix</strong><br><a href="https://matrix.org/blog/home/" rel="nofollow" target="_blank">Matrix</a> is a free and open source decentralized communication protocol. Anyone can host a server (called a homeserver) and people from different servers are able to communicate with each-other. The current go-to homeserver solution is <a href="https://matrix.org/docs/guides/installing-synapse" rel="nofollow" target="_blank">Synapse</a>, however more options are coming in the future.</p>
<p>As a disclaimer I’d like to say that Synapse is a large application and it might not be plausible for you to host it on your machine.</p>
<p><strong>4. Simple and modern: Rocket.Chat</strong><br><a href="https://rocket.chat/" rel="nofollow" target="_blank">Rocket.Chat</a> is a free and open source communication platform aimed for teams. Despite being aimed for teams, it’s also a great solution for chatting with your friends. It allows you to create rooms and also provides end-to-end encryption for messages.</p>
<p>I’ve personally hosted a Rocket.Chat instance and can say that it is a good platform, however me and my buddies are old-school and like our IRC server more.</p>
<h3>4.1. Your own social network!</h3>
<p>Have you ever thought about running a Twitter-like platform that you had full control over? Well, now you can! With <a href="https://joinmastodon.org/" rel="nofollow" target="_blank">Mastodon</a>, you can create your own social networking platform, called an instance. Instances are joined together in a global federated network called the <a href="https://en.wikipedia.org/wiki/Fediverse" rel="nofollow" target="_blank">Fediverse</a>, which allows you to communicate with anyone on any Mastodon (or other platform on the Fediverse) server without making multiple accounts.</p>
<h2>Conculsion, for now..</h2>
<p>There’s a lot of things you can do with your own server. Hopefully this blog post was of any use to you.</p>
]]></content>
        <category scheme="https://lunasqu.ee/blog/tags/linux" term="linux"/>
        <category scheme="https://lunasqu.ee/blog/tags/tutorial" term="tutorial"/>
        <published>2019-02-23T21:17:18.000Z</published>
    </entry>
    <entry>
        <title type="html"><![CDATA[How to install Arch Linux]]></title>
        <id>https://lunasqu.ee/blog/2018/03/15/How-to-install-Arch-Linux</id>
        <link href="https://lunasqu.ee/blog/2018/03/15/How-to-install-Arch-Linux"/>
        <updated>2018-03-15T15:21:22.000Z</updated>
        <summary type="html"><![CDATA[Today I’m going to instruct you through the steps of installing your own Arch Linux system. ]]></summary>
        <content type="html"><![CDATA[<p>Today I’m going to instruct you through the steps of installing your own Arch Linux system.</p>


<h2>Download the ISO</h2>
<p>You can find the <a href="https://www.archlinux.org/download/" rel="nofollow" target="_blank">downloads for Arch Linux by clicking here</a>.</p>
<h2>1. Partition the drive</h2>
<p>Determine your drive name by running <code>lsblk</code>. Run the following command to start the partitioning (with <code>/dev/sda</code> replaced by your drive):</p>
<div class="codeblock"><pre><code class="hljs language-plaintext"># fdisk /dev/sda</code></pre></div><ol>
<li>Enter <code>n</code> to create a new partition.</li>
<li>Press Enter on the following prompts to accept the defaults.</li>
<li>Enter <code>w</code> to write your changes to the disk.</li>
</ol>
<h2>2. Create the File System and mount it</h2>
<p>Next, you need to create a filesystem on the partition that you’ve made. After you’ve created the filesystem, you can mount it.</p>
<div class="codeblock"><pre><code class="hljs language-plaintext"># mkfs.ext4 /dev/sda1
# mount -t ext4 /dev/sda1 /mnt</code></pre></div><h2>3. Install Arch Linux system</h2>
<p>This is maybe the most important step in the progress. This is the step where you are actually installing the system. For that, you need to run <code>pacstrap</code> followed by the packages you want to install. In this case, we’ll install <code>base</code> and <code>grub</code> for the bootloader.</p>
<div class="codeblock"><pre><code class="hljs language-plaintext"># pacstrap -i /mnt base grub</code></pre></div><h2>4. Generate File System Tab</h2>
<p>The file <code>fstab</code> contains descriptive information about the filesystems the system can mount.</p>
<div class="codeblock"><pre><code class="hljs language-plaintext"># genfstab -U -p /mnt &gt;&gt; /mnt/etc/fstab</code></pre></div><h2>5. Enter the system via <code>chroot</code></h2>
<p>Now, we’re ready to set up the system by going inside it. For this, we’ll be running <code>arch-chroot</code>. <strong>Do NOT reboot at this stage!</strong></p>
<div class="codeblock"><pre><code class="hljs language-plaintext"># arch-chroot /mnt /bin/bash</code></pre></div><h2>6. Setting up locales</h2>
<p>Locales are basically the language files your system will be using.</p>
<div class="codeblock"><pre><code class="hljs language-plaintext"># nano /etc/locale.gen
 Uncomment line en_US.UTF-8 UTF-8
 Uncomment line en_US ISO-8859-1

(uncomment by removing the `#` in front)</code></pre></div><p>After that, you have to generate the locale files.</p>
<div class="codeblock"><pre><code class="hljs language-plaintext"># locale-gen</code></pre></div><p>And then put them into effect on the system.</p>
<div class="codeblock"><pre><code class="hljs language-plaintext"># echo LANG=en_US.UTF-8 &gt; /etc/locale.conf
# export LANG=en_US.UTF-8</code></pre></div><h2>7. Setting the timezone</h2>
<p>All timezone files can be found in <code>/usr/share/zoneinfo/</code>. You need to create a link to <code>/etc/localtime</code> with the timezone you want.</p>
<div class="codeblock"><pre><code class="hljs language-plaintext"># ln -s /usr/share/zoneinfo/LOCATION/CITY /etc/localtime</code></pre></div><h2>8. Set the hardware clock</h2>
<p>This command sets the hardware clock from system time. <code>--utc</code> implies that your hardware clock is in the UTC timezone. More information <a href="https://wiki.archlinux.org/index.php/Time#Hardware_clock" rel="nofollow" target="_blank">here</a></p>
<div class="codeblock"><pre><code class="hljs language-plaintext"># hwclock --systohc --utc</code></pre></div><h2>9. Set your system’s hostname</h2>
<p>This can be anything you want.</p>
<div class="codeblock"><pre><code class="hljs language-plaintext"># echo &quot;my-computer&quot; &gt; /etc/hostname</code></pre></div><h2>10. Set up simple networking</h2>
<p>Before you do the following, please run <code>ip a</code> to determine your interface. It’s generally called <code>eth0</code>, but it may be different on some machines.</p>
<ol>
<li>Copy the example</li>
</ol>
<div class="codeblock"><pre><code class="hljs language-plaintext"># cp /etc/netctl/examples/ethernet-dhcp /etc/netctl/my_network</code></pre></div><ol start="2">
<li>Modify the interface name</li>
</ol>
<div class="codeblock"><pre><code class="hljs language-plaintext"># nano /etc/netctl/my_network
    Replace the &quot;Interface=eth0&quot; line with the one shown by the &quot;ip a&quot; command.</code></pre></div><ol start="3">
<li>Enable the network</li>
</ol>
<div class="codeblock"><pre><code class="hljs language-plaintext"># netctl enable my_network</code></pre></div><h2></h2>
<p>Setting a password on your root user is highly recommended. You can do that now by running <code>passwd</code></p>
<h2></h2>
<p>You can find information on how to install GRUB on various systems on the <a href="https://wiki.archlinux.org/index.php/GRUB" rel="nofollow" target="_blank">Arch Linux Wiki</a>. The following is a simple installation on a system with a <strong>BIOS</strong> (not <strong>UEFI</strong>). You can find more boot loaders <a href="https://wiki.archlinux.org/index.php/Category:Boot_loaders" rel="nofollow" target="_blank">here</a>.</p>
<div class="codeblock"><pre><code class="hljs language-plaintext"># grub-install --recheck /dev/sda
# grub-mkconfig -o /boot/grub/grub.cfg</code></pre></div><h2>13. Reboot the machine</h2>
<p>You are now ready to boot into your new system.</p>
<div class="codeblock"><pre><code class="hljs language-plaintext"># exit
# umount /mnt
# shutdown</code></pre></div><p>After shutting down, remove the disk image and boot the system again. <strong>You can now use your newly installed system!</strong></p>
<h1>More things to do</h1>
<h2>Creating an user account</h2>
<p>The first user you create should also be added to the <code>wheel</code> group. This will be kind of like an administrator.</p>
<div class="codeblock"><pre><code class="hljs language-plaintext"># useradd -m -G wheel -s /bin/bash usernamehere
# passwd usernamehere</code></pre></div><p>For creating other users, you should omit the <code>-G wheel</code> part unless you want them to be able to use <code>sudo</code>.</p>
<h3>Enabling <code>sudo</code></h3>
<ol>
<li>Install sudo - <code># pacman -S sudo</code></li>
<li>Create a file in <code>/etc/sudoers.d/99-wheel</code> with the following lines:</li>
</ol>
<div class="codeblock"><pre><code class="hljs language-plaintext">%wheel ALL=(ALL) ALL</code></pre></div><p>If you want the <code>wheel</code> group to be able to use sudo without password, you can replace the last <code>ALL</code> with <code>NOPASSWD: ALL</code>.</p>
<h2>Installing a Desktop Environment</h2>
<p>Firstly, you should install <code>xorg</code> packages.</p>
<div class="codeblock"><pre><code class="hljs language-plaintext"># pacman -S xorg-server xorg-xinit xorg-server-utils mesa xterm</code></pre></div><p>For graphics drivers, you can look at the wiki: <a href="https://wiki.archlinux.org/index.php/Intel_graphics" rel="nofollow" target="_blank">Intel</a>, <a href="https://wiki.archlinux.org/index.php/ATI" rel="nofollow" target="_blank">ATI</a>, <a href="https://wiki.archlinux.org/index.php/AMDGPU" rel="nofollow" target="_blank">AMD</a> and <a href="https://wiki.archlinux.org/index.php/NVIDIA" rel="nofollow" target="_blank">NVIDIA</a>.</p>
<p><strong>You can find packages for various desktop environments <a href="https://wiki.archlinux.org/index.php/Desktop_environment" rel="nofollow" target="_blank">here</a>.</strong></p>
<h3>Install <code>lightdm</code></h3>
<p>Some desktop environments don’t have a system to log you in to a session. This is where <code>lightdm</code> comes to play.</p>
<div class="codeblock"><pre><code class="hljs language-plaintext"># pacman -S lightdm lightdm-gtk-greeter
# systemctl enable lightdm.service</code></pre></div><p>You can find lightdm configuration at <code>/etc/lightdm/lightdm.conf</code>.</p>
<p>After you’ve installed what you want, you can reboot the system and it should either load up the desktop environment or the <code>lightdm-gtk-greeter</code>, which will allow you to select a desktop environment to log in to.</p>
<h2>Keeping your system up-to-date</h2>
<p>You should keep your system up-to-date to get the latest packages and security patches. Arch Linux is a <strong>rolling release</strong> distribution, meaning that you don’t have to reinstall the entire system and package updates are rolled separately instead of in bundles.</p>
<div class="codeblock"><pre><code class="hljs language-plaintext"># pacman -Syu</code></pre></div><p>This command synchronizes your system with the latest repositories and installs all available updates.</p>
<h1>That’s it!</h1>
<p>This should be your basic Arch Linux system ready to go! Always remember that the <a href="https://wiki.archlinux.org/" rel="nofollow" target="_blank">Arch Linux Wiki</a> is a great place to find help for all things Linux, not just Arch!</p>
]]></content>
        <category scheme="https://lunasqu.ee/blog/tags/linux" term="linux"/>
        <category scheme="https://lunasqu.ee/blog/tags/tutorial" term="tutorial"/>
        <published>2018-03-15T15:21:22.000Z</published>
    </entry>
    <entry>
        <title type="html"><![CDATA[Giving a shot at making a game using Godot Engine 3.0]]></title>
        <id>https://lunasqu.ee/blog/2018/02/03/Giving-a-shot-at-making-a-game-using-Godot-Engine-3-0</id>
        <link href="https://lunasqu.ee/blog/2018/02/03/Giving-a-shot-at-making-a-game-using-Godot-Engine-3-0"/>
        <updated>2018-02-03T10:43:10.000Z</updated>
        <summary type="html"><![CDATA[Hello!In the past week, I’ve been working on a simple 3D game using Godot Engine 3.0 (go-doh). In this article, I will show off some of the features and discuss how it all works.]]></summary>
        <content type="html"><![CDATA[<p>Hello!<br>In the past week, I’ve been working on a simple 3D game using <a href="https://godotengine.org/" rel="nofollow" target="_blank">Godot Engine 3.0</a> (<em>go-doh</em>). In this article, I will show off some of the features and discuss how it all works. Here’s a quick demo of the gameplay:</p>
<h1>Mechanics</h1>
<h2>Block breaking</h2>
<p>Blocks can be broken by just clicking on a tile of the chunk. The speed of the breaking and the damage dealt to the tile depend on the current pickaxe. Pickaxes can be upgraded in the Shop GUI. Pickaxes also have a durability value, which will always be kept at maximum when you’re on the surface. The current pickaxe along with it’s durability is displayed in the bottom right corner of the screen. When your pickaxe “breaks”, you will stop mining and you won’t be able to start mining until you repair it or return to the surface.</p>
<h2>Bombing</h2>
<p>Blocks can also be broken using bombs. By placing a bomb, it takes approximately 3 seconds to detonate and it <strong>damages</strong> blocks in a 4 tile radius. Tougher blocks located deeper in the mine wont be broken by a bomb, instead made softer and thus they will take less time to mine with a pickaxe. When a bomb blows up tiles, you won’t get them in your inventory.</p>
<h2>Shop</h2>
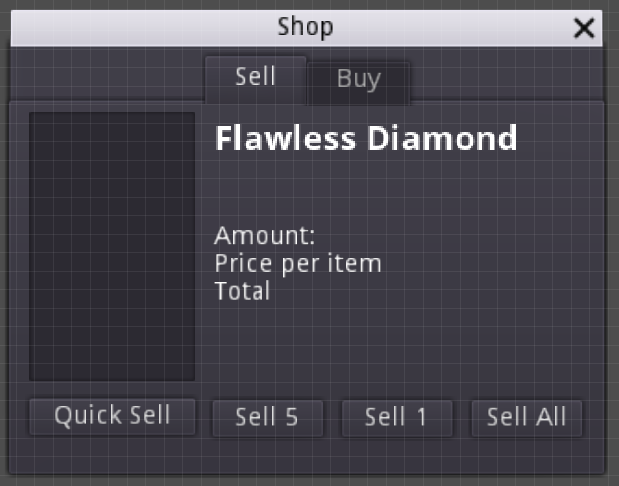
<p>In the shop GUI, you can sell your mined blocks for money or buy items like torches, bombs and better pickaxes. Money can only be earned by selling the blocks you’ve mined.</p>
<h2>Minerals</h2>
<p>This is the list of minerals currently generated in the chunk and their yield when sold:</p>
<ul>
<li>Copper - $15</li>
<li>Iron - $20</li>
<li>Silver - $50</li>
<li>Gold - $100</li>
<li>Amethyst - $250</li>
<li>Emerald - $300</li>
<li>Sapphire - $400</li>
<li>Ruby - $500</li>
<li>Diamond - $1000</li>
<li>Flawless Diamond - $2500 (rarest)</li>
</ul>
<p>Note that all of these are not guaranteed to generate. It depends on the random seed and the y value.</p>
<h1>Scenes</h1>
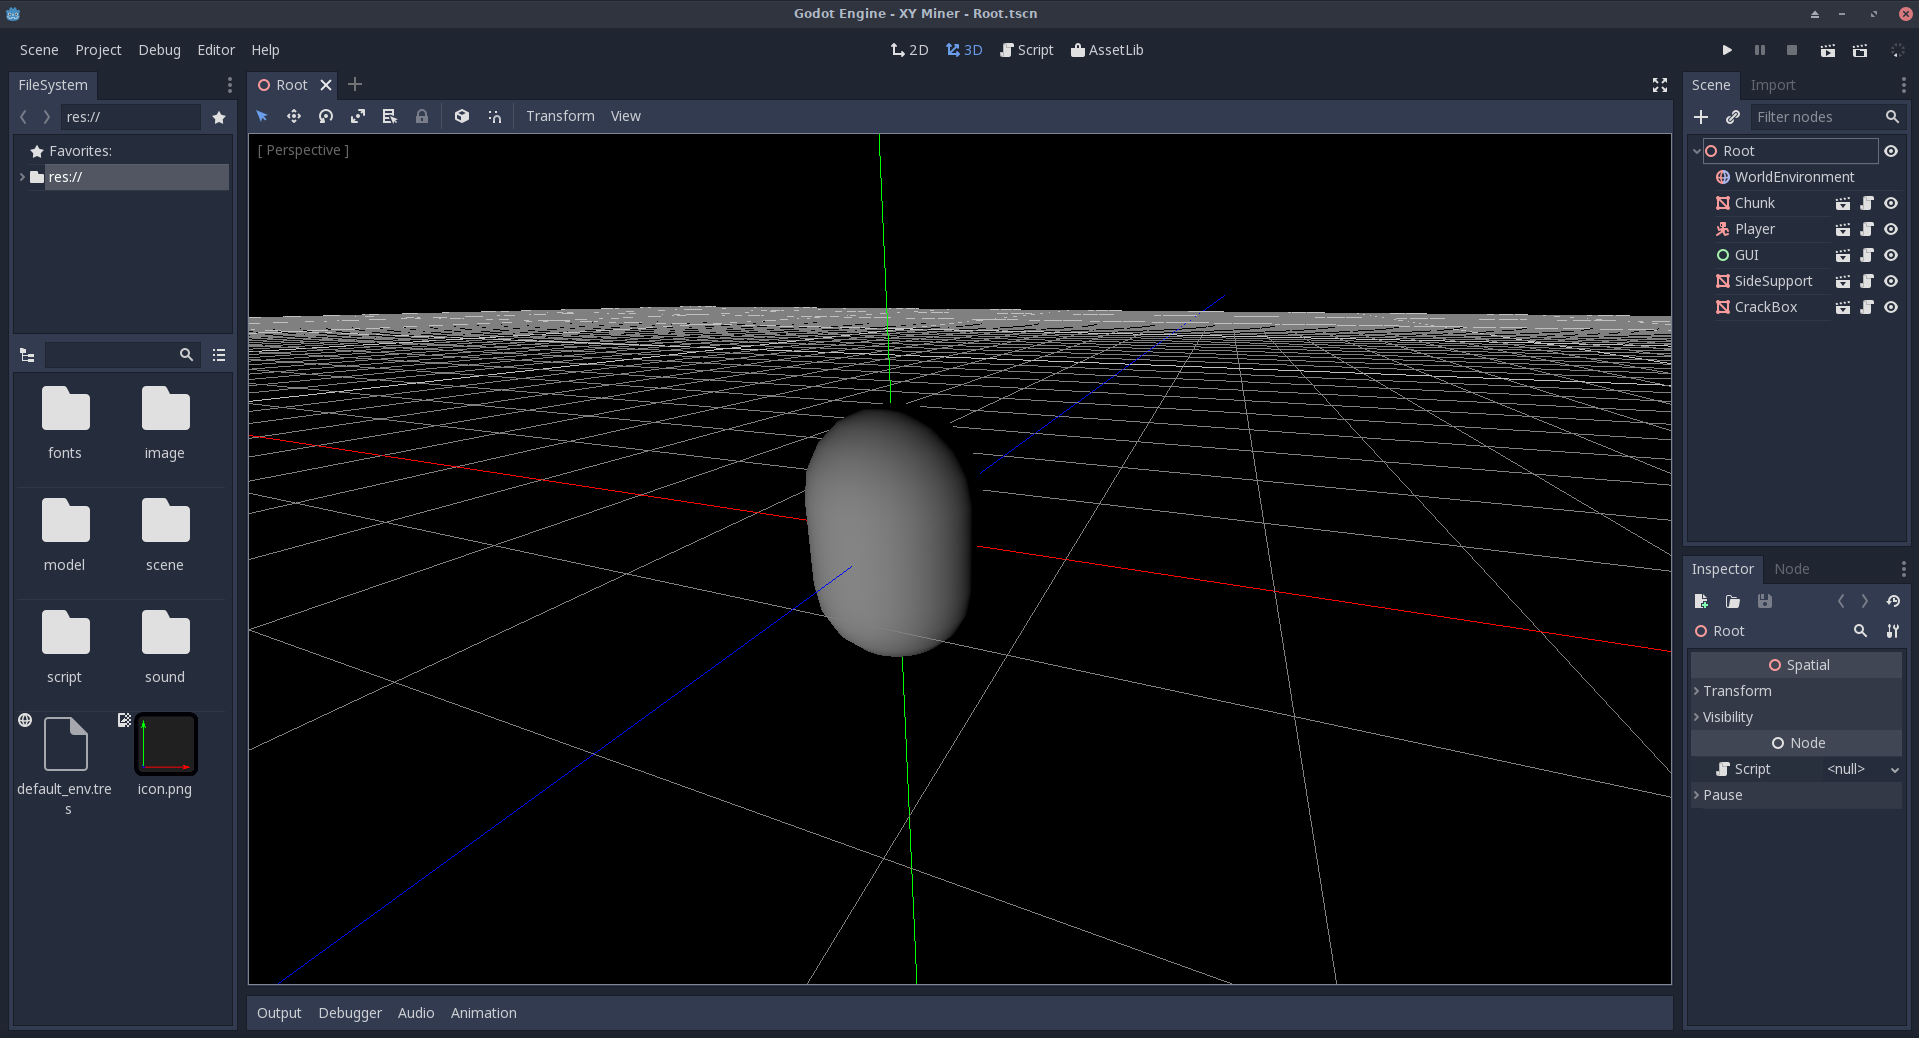
<p>Godot uses Scenes, which can be easily instanced. The following image is the Godot editor, in it I have opened the root scene, which will be the point where the game runs.<br><img src="https://i.lunasqu.ee/blog/root_scene.png" alt="Root Scene"><br>On the right, you can see the scene tree.<br><img src="https://i.lunasqu.ee/blog/instances.png" alt="Instances"></p>
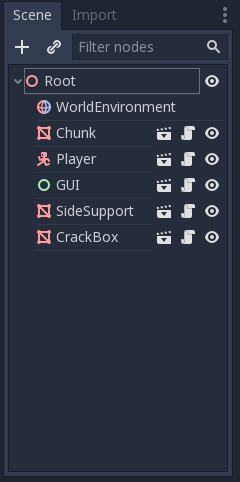
<ul>
<li><a href="http://docs.godotengine.org/en/3.0/classes/class_spatial.html" rel="nofollow" target="_blank">**Root**</a> - This is the first node in the scene, containing everything.</li>
<li><a href="http://docs.godotengine.org/en/3.0/classes/class_worldenvironment.html" rel="nofollow" target="_blank">**WorldEnvironment**</a> - Controls the overall look of the scene. I have configured it to give me a completely black scene without a background.</li>
<li>All of my other custom scenes follow these.</li>
</ul>
<h2>The Chunk</h2>
<p>The Chunk is a <a href="http://docs.godotengine.org/en/3.0/classes/class_meshinstance.html" rel="nofollow" target="_blank">MeshInstance</a> which I use to generate a random mine with. I’ve attached a script to this node which generates a mesh and assigns it to the MeshInstance.<br>Using <a href="http://docs.godotengine.org/en/3.0/classes/class_surfacetool.html" rel="nofollow" target="_blank">SurfaceTool</a>, you can create geometry by specifying the vertices individually.</p>
<div class="codeblock"><pre><code class="hljs language-plaintext"># Create a new SurfaceTool instance
var st = SurfaceTool.new()

# Begin specifying your vertices using primitive type of triangles. Every 3 vertices is a triangle.
st.begin(Mesh.PRIMITIVE_TRIANGLES)

# Half of a quad
st.add_uv(Vector2(1,1))
st.add_vertex(Vector3(0,0,1))

st.add_uv(Vector2(1,0))
st.add_vertex(Vector3(0,1,1))

st.add_uv(Vector2(0,1))
st.add_vertex(Vector3(1,0,1))

# Output the mesh
var mesh = st.commit()</code></pre></div><p>This is just a basic example of what you can do with SurfaceTool, but as you can see, it’s a great way to create procedural geometry. Alongside this I use some code to decide which material to use for which tile and the ability to regenerate the mesh when a tile is changed.</p>
<h2>The Player</h2>
<p>The player is currently just a simple CapsuleMesh with a camera, a light, some raycasts and some sounds attached to it.</p>
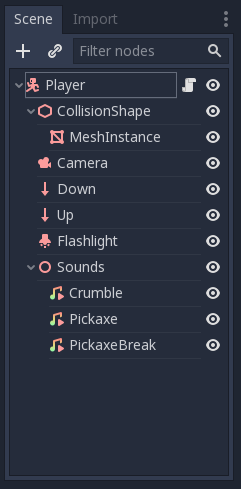
<p><img src="https://i.lunasqu.ee/blog/player_scene.png" alt="Player Scene"><br>The script attached to it deals with <a href="http://docs.godotengine.org/en/3.0/classes/class_kinematicbody.html" rel="nofollow" target="_blank">KinematicBody</a> movement and the block break animation. The RayCasts are used to determine whether the player is colliding with the chunk or not. The RayCast pointing up is used to cancel the jump when player hits a tile from below.</p>
<h2>The GUI</h2>
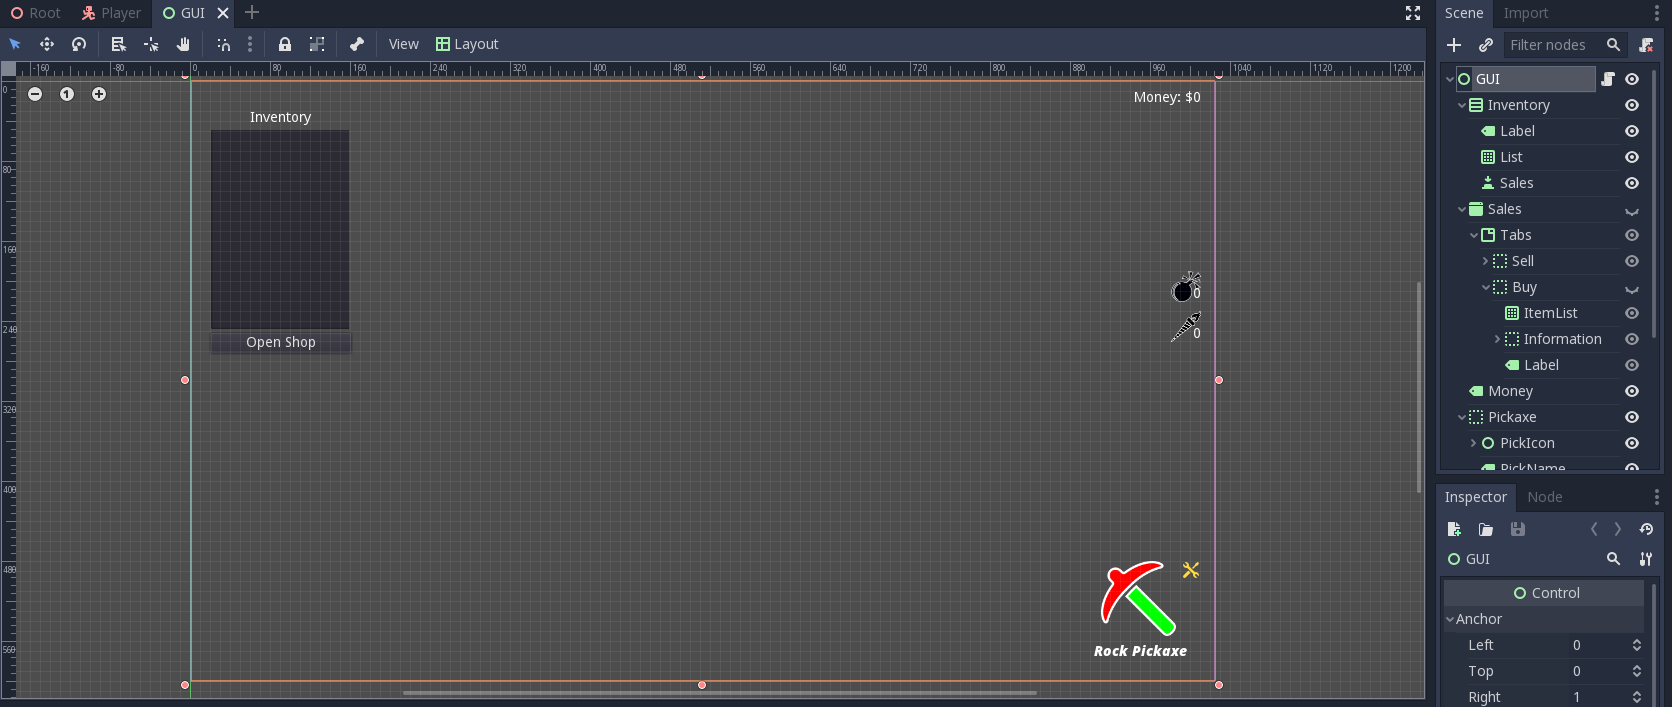
<p><img src="https://i.lunasqu.ee/blog/gui.png" alt="GUI Scene"><br>GUI in Godot is created using the <a href="http://docs.godotengine.org/en/3.0/classes/class_control.html" rel="nofollow" target="_blank">Control</a> class and it’s inherited classes.<br>In the GUI scene I have a simple <a href="http://docs.godotengine.org/en/3.0/classes/class_itemlist.html" rel="nofollow" target="_blank">ItemList</a> inventory and a few other items. The main thing the GUI does is the shop: buy and sell system.</p>
<p><img src="https://i.lunasqu.ee/blog/shop.png" alt="The Shop Dialog"></p>
<p>On the righthand side, there are two image buttons that spawn an instance of another scene and translate it to the player’s current position. These two buttons are Bomb and Torch, which “place” their respective item.</p>
<div class="codeblock"><pre><code class="hljs language-plaintext"># Load the scene
var scene = load(&quot;res://scene/props/bomb.tscn&quot;)

# Get the root instance of the scene, in this case it&#x27;s a Spatial
var node = scene.instance()

# Translate the Spatial
node.set_translation(Vector3(x, y, z))

# Add it to the Root scene
get_node(&quot;../&quot;).add_child(node)</code></pre></div><h2>SideSupport</h2>
<p>This scene generates 4 quads that cover the chunk. These prevent the player from walking off of the chunk or falling out the bottom.</p>
<h2>CrackBox</h2>
<p>This scene generates a quad that has a variable texture. This scene is used to display the breaking animation of a tile, by translating it to the currently “broken” tile and setting the Texture of the material to one of the 6 crack textures.<br><img src="https://i.lunasqu.ee/blog/crack.png" alt="The 6 textures used to represent the tile breaking"></p>

<h1>The Source</h1>
<p>The source of this project is available <a href="https://github.com/LunaSquee/xyminer" rel="nofollow" target="_blank">on my GitHub account</a>. I’ve laid out the scenes, scripts, etc. into a nice folder structure so you can easily see where the things are located. I recommend you do the same when you’re making a game in Godot. If you want to try the game yourself, you can clone or download the repository onto your computer and <strong>Import</strong> it in the project list of the editor. Downloads are not currently available as the game is still in development, but you can easily export them in the editor.</p>
<h1>Conclusion</h1>
<p>I think that Godot is a really great game engine. It lets you do amazing things quite easily. The community is also very helpful and the <a href="http://docs.godotengine.org/en/3.0/" rel="nofollow" target="_blank">documentation</a> is good enough for you to get started. This game still needs work for it to be enjoyable, but it’s been quite fun getting this far and I thought I’d share it with you.</p>
]]></content>
        <category scheme="https://lunasqu.ee/blog/tags/game" term="game"/>
        <category scheme="https://lunasqu.ee/blog/tags/projects" term="projects"/>
        <category scheme="https://lunasqu.ee/blog/tags/godot" term="godot"/>
        <published>2018-02-03T10:43:10.000Z</published>
    </entry>
    <entry>
        <title type="html"><![CDATA[Welcome to my blog!]]></title>
        <id>https://lunasqu.ee/blog/2018/01/26/Welcome-to-my-blog</id>
        <link href="https://lunasqu.ee/blog/2018/01/26/Welcome-to-my-blog"/>
        <updated>2018-01-26T10:00:00.000Z</updated>
        <summary type="html"><![CDATA[So, I’ve decided to start a new blog using Hexo.I’ll probably be using this to share my projects and write some tutorials. ]]></summary>
        <content type="html"><![CDATA[<p>So, I’ve decided to start a new blog using <a href="https://hexo.io/" rel="nofollow" target="_blank">Hexo</a>.<br>I’ll probably be using this to share my projects and write some tutorials.</p>


<h2>Current projects</h2>
<p>I’m currently taking a break from writing code due to personal reasons, but I’m mainly working on my network, <a href="https://icynet.eu" rel="nofollow" target="_blank">Icy Network</a>. The main project in the works is <a href="https://github.com/IcyNet/Episodes.Community" rel="nofollow" target="_blank">Episodes.Community</a>, which is basically a site where people can watch and share links to their favorite TV shows and cartoons.</p>
]]></content>
        <category scheme="https://lunasqu.ee/blog/tags/projects" term="projects"/>
        <category scheme="https://lunasqu.ee/blog/tags/update" term="update"/>
        <published>2018-01-26T10:00:00.000Z</published>
    </entry>
</feed>